
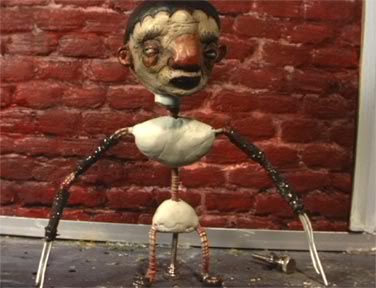
CD is starting to look more like a puppet. In fact, a very Czech puppet, something I've always wanted to achieve but haven't been able to yet. And now he's got some bones.
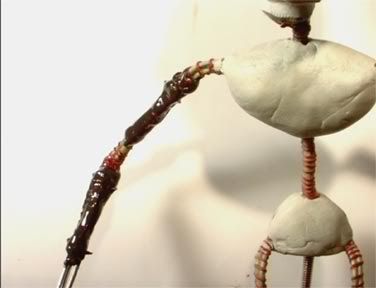
Here's an (ugly) closeup... hopefully you can make out the threads under/immersed in the nasty-looking JB Quickweld. Here's what i did....
I cut some nails to the length I wanted each arm segment to be (leaving plenty of room in between segments so the wire won't have to bend too sharply). I made sure to cut off the head and the point on each nail. Then I filed down the cut ends so they're rounded (no need tempting fate... I'd hate for a bone end to suddenly pierce through the arm during shooting). I also filed down the entire length of the nail so the JB Weld can grip it firmly. Once I had all 4 nails set up like this, I cut 4 lengths of silk thread - a little longer than I thought I'd need, and I pre-tied a slipknot in one end of each. The reason for this will become clear in a moment. Now things get crazy... the Quickweld sets in 4 minutes, so I had to work fairly fast. Actually it wasn't like crazy-fast or anything, but there was no room for errors and re-dos. Heh... actually I didn't think to pre-tie the slipknot in the first piece of thread until after attempting this the first time, and that one did get crazy, but after that I pre-tied each one.
Ok, I mixed up just enough JB Weld to do one bone segment, and I applied it to the arm with a little spatula thing. I first examined the arms and decided exactly where I wanted to lay the bone segments.... I fit them into natural troughs between the arm wires. Now I apply the JB Weld and drop a bone in place, and then quickly take one of the pieces of thread and tighten the slipknot around the end of the bone to secure it against the arm. By this time the JB Weld is trying to sag and drip off onto the puppet's head or onto my jeans, but it's thick gummy stuff, so a little slow rotation keeps that under control. Once the slipknot is secured, clip off the end of the thread and start wrappin'. I made sure to completley cover the end of the bones, with both thread (lots of extra wrappings) and Quickweld so the ends don't try to lift up later. Once I reach the far end of the bone and get that securely wrapped, I tie it off and cut off the excess. Then, if the quickweld isn't too stiff yet (it's getting close in any event) I try to add a little more in places and smooth down what squeezed through the wrappings. The idea is to have the wrapped thread completley immersed inside the epoxy... so once that's set it's all one solid form. No way will any of this thread come unwrapped later!
Still not entirely sure how I'm gonna do hands. I think I'll use thinner guage wire... Buster's fingers are made from the extended arm wires, and they're a bit too stiff.
2 comments:
Weeee.
I twisted verrrry thin wire for Pandora and now Nola 2's fingerses and it has worked out alright so far, not that either has been overly animated ;) At some point I mean to try out this silken wrap technique you've got going on, thanks for the runthrough...
Post a Comment