Saturday, February 26, 2011

Enabling live view out on the G1!!


Well well.... Lookie what I got here!! It LOOKS like a honest-to-goodness Live Video Feed from my G1. But -- it can't be. No such thing is possible, right?

Wrong!!

There's a little trick - a hack of sorts, in Panasonic cameras (some anyway - I'm assuming the ones with an LCD viewscreen attached)). All you have to do is hold down the trashcan button for about 30 seconds in record mode (regular picture-taking mode, not review mode). Suddenly the image on the viewscreen of the camera will go dark for just an instant. Was there a tiny click or sound of some sort from the camera? I thought so, but it might have just been something in my head busting wide open from the sudden release of tension, and the inrushing of excitement to replace it.

I can't even tell you what a rollercoaster these last few days have been for me... deciding to buy the G1, discovering the live feed doesn't work, the anger and frustration and the decision to sell it and start researching for a micro four thirds camera that would work... then the sudden green light when I remembered reading that this trick works with some cameras.

I was sitting down at the time eating some stir fry chicken and watching the trailer for the upcoming Harryhausen Tribute when it happened. I leaped from my seat in a rush of excitement to try it, but decided to wait till I was done eating so my rather excellent dinner wouldn't go cold. I could hardly contain myself... and ate way too fast. With a bit of a tummyache, I then levered myself up and began to set things up for the test. Imagine my consternation and frustration when before I could even finish opening Framethief the camera shut itself down with an audible electronic groan due to expended battery life!!

I put it on the charger and chewed my nails for 2 and a half agonizing hours waiting as electricity slowly trickled into that faceless, mocking little cube of plastic. But at last it was full as I was, and the test commenced. Now I'm full and satisfied. What a day!!


Oh, and yes, I can easily make all the screen icons go away with the click of a button.


Oh oh!! And I almost forgot to add.... you have to reset the Resolution settings in Framethief to 3:2, which is the native resolution of the Micro Four Thirds camera system (strange as that may sound... part of the reason for the very name is because the default resolution they provide is 4:3). Another discovery made in my exhaustive research recently to save the day. I kept trying various resolution presets provided in Framethief to no avail, Buster always looked either too Laurel or too Hardy, if you get my drift. But of course, the presets were configured for VIDEO cameras, not still cameras! So recalling a strange bit of trivia I dug up the other day (which incidentally explains why the MFT cameras truly use full resolution in all aspect ratios, 16:9 as well as 4:3 etc) I manually punched in 3:2 and it worked!

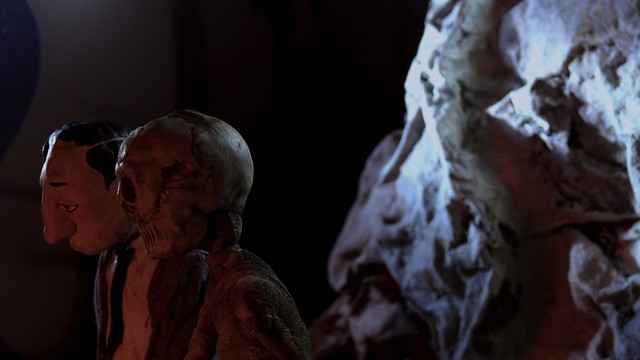
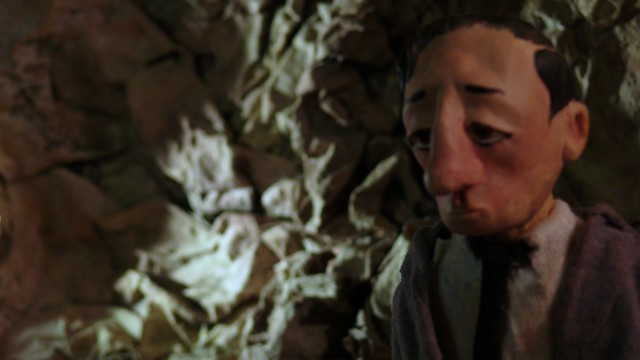
Heh... actually this explains the weird setup with Skulkin leaning on Buster above.... I was beginning to doubt my eyes and think that maybe Buster was really either thicker or thinner than I believed. I propped Skulkin up against him so I could see another face... Buster's is rather strangely proportioned.

It didn't help... Skulkin is rather weirdly put together too...

Friday, February 25, 2011

The Lumix Smackdown Challenge - putting the G1 and the FZ50 through their paces

XtremeCloseupG1full
XtremeCloseupG1full

I won't write a lot about this here... just click the image above and view the group of pictures uploaded to my Lumix Smackdown Challenge set. Yes, I finally decided it was time to buy the much-lauded G1 and give it a whirl. 

A warning right up front though - DO NOT BUY THE G1 FOR STOPMO!!! It does NOT have a true full-time live feed that works with a framegrabber!!! (Actually it DOES have live view out - see next post for details on how to enable it) In many other respects it remains similar to it's larger but less refined cousin the FZ50, but for some reason Panny decided to disable the full-time live view out. 
In fact my research revealed that NO Micro Four Thirds camera yet made has live view out that actually functions in another device (like a framegrabber for instance)... until the newly-released GH2. I might be selling my shiny sexy new G1 to get one and test it out. Keep watching this space. 

Ok, for more info check THIS THREAD at the stopmotion message board. 

Enough typing for tonight... Im wiped out from massive research and camera testing. 

Saturday, February 12, 2011

Modding a mic stand for swing-arm action -- Shelley, this one's for you!

Photobucket

 Shelley really got me thinking about this the other day.

Well, I finally unpacked enough stuff in my new house that I can begin animating! I set up a shot (I want to get a little more practice in with Skulkin before I start in on the actual film itself) and discovered that even with my upgraded lighting grid, I just can't get lights to all the places I really want them. I had already built a pair of extensions I can clamp to the ceiling joists to clamp lights to, because I wanted some lights lower than my original grid would allow. But still I was too limited... I needed some way to attach a swing arm boom to them. I spent the evening cogitatin' on this problem, and slowly but surely ground out a solution using a couple of mic stands I already had on hand.


They're just cheap stands from Musician's Friend, similar to this one.


Mine aren't that tall though... I got some kind of shorties. I'm sure either will work just fine... a longer one might reach down lower than mine. 


Photobucket

One problem I had to overcome - the tubing used for the mic stands is too small in diameter... the C-clamps I have won't close down small enough to get a grip on it. I solved that with two pieces of wood and a little electrician's tape (I haven't unpacked far enough to find my gaffer's tape, or I'd use that instead).

This kind of C-clamp can be bought from a music store or a lighting supplier who handles disco type lights. If you walk into a hardware store and ask for a C clamp, they won't have this kind.


Photobucket

Here you see it all taped up. Now it can get a tight grip on the mic stand.


Photobucket

I had to use 2 C-clamps... one to attach it to the ceiling joist and one to attach the lighting unit. Notice I removed the bolt from the clamp that will attach to the ceiling.


Photobucket

Here's the whole assembly. Oh, I didn't get pics of this, but I had to cut off the bottom of the stand to remove the tripod legs. A hacksaw is essential equipment!


Photobucket

Here's the ceiling attachment. Now you can see why I had to remove the bolt... though I suppose you could substitute a big wood screw and mount it permanently, or drill through the joist and use a coach bolt. I like the ability to move it wherever I want though.


Photobucket

Another shot of the mount... plus the big knob that tightens the swing arm boom.


Photobucket

It can swing from here too.


Photobucket

The business end, bearing one of my modded Blackbird PAR 16's. Oh, I finally managed to find a US site that sells barndoors for them! Here it is: Stage Spot.


Photobucket

I wanted to post this one to show how I attached the tracklight unit into the snout of a PAR 16. The older PAR units I bought from Musician's Friend were made a little differently, and you could just jam them together for a perfect pressure fit, but the newer models have thicker rivets inside that prevent that, so I just busted out the FastSteel epoxy putty and packed a ring of it inside. First I coated the end of the tracklight unit itself with dishwashing liquid as a release, and before the putty fully cured I gently rotated it to break the bond... now the putty will stay inside the PAR snout and I can remove the track light if I want.

Friday, February 04, 2011

Getting along with YouTube a lot better now


A few posts back I badmouthed the most popular video sharing site on the net. Turns out my problem was I didn't understand the special requirements for Mac users. I was following advice aimed at PC users... normally I pay close attention to the distinction, but for some reason I didn't even think about it in this case. Well today I dug deep in the hidden bowels of YouTube and found a post on their user help forum delineating the procedure for Mac users.

Here's the post itself, copied here for your convenience:


Level 9
12/14/10
Some of the recommendations in YouTube's "Help articles" for Apple users creating .MOV files contradict guidance given elsewhere or use terms only software developers would be familiar with.  I believe the instructions below cover the major do's and don'ts for creating .MOV files that are "YouTube Friendly".


Instructions for advanced Mac users creating .MOV files for YouTube

YouTube doesn't support or improperly decodes some of the more advanced features and data types that may be used in .MOV files.  When creating .MOV files that will be uploaded to YouTube you can increase the chances your movie will playback properly by conforming your .MOV file to the following specifications:

Video Track (required)
  - must contain 1 and only 1 Video Track
  - do not use "Frame Reordering"
  - H.264 encoded
  - 23.98, 24, 25, 29.97, 30 are acceptable Frame Rates

Sound Track
 (optional)
  - may contain 1 and only 1 Sound Track
  - Sound Track [if present] must be of equal length as Video Track
  - AAC encoded

"Prepare for Internet Streaming" (required)
  - must be "Fast Start"

Do not include any other type of "Tracks" other than the 1 required Video Track and 1 optional Sound Track.  Do not embed XML, XMP, or EDL data.

If you are creating a .MOV for a client that may upload the file to YouTube you should explain the importance of not editing the movie in any way since that invalidates the "Fast Start" option.  Make sure clients understand that adding or deleting bumpers, bugs, color-bars, credits, black, slates, etc. is considered "editing".

---
Update:
Sound Track specs addendum:
  - "AAC" encoded with "Constant Bit Rate" option
12/16/10

Found on this web page.

Additionally, a YouTube staffer posted this helpful info:

File format and editing tips for Apple users

If you're a Quicktime ProFinalcut Pro, or iMovies user, check out the following tips on how to export your video files and get the best results out of uploading to YouTube and the transcoding of your files.

How to enter Options for:
  • iMovie: File > Export > Compress movie for: Expert Settings > Share > Export: Movie to QuickTime Movie > Options
  • Finalcut Pro: File > Export > Using Quicktime Conversion > Options
  • QuickTime Pro: File > Export > Export: Movie to QuickTime Movie > Options

From Options:


  1. In the Video section select the following:
    • Compression Type: H264
    • Frame Rate: 30
    • Data Rate: Automatic
      (if you choose to restrict the Data Rate, make sure to choose the highest value acceptable to you — more bits means better quality)
    • Key Frames: Automatic
    • Frame Reording: Unchecked
  2. In the Video section click Size and set Dimensions to the original size of your video (Note: HD resolutions - 1280x720 or 1920x1080 - preferred).
  3. Select Prepare for internet Streaming and choose Fast Start from the drop-down menu.
  4. In the Audio section, make sure that the audio codec is AAC. Always use AAC as the preferred audio codec.
  5. Once you've made all of these selections, click the OK button to save your preferences.
  6. Add a title to the video file and click the Save button to save your edited version of your movie. Your project will then be exported and be ready to upload to YouTube.

On This page.

And to test it, I finally dug out the original file of Terror in the Pumpkin Patch, formerly only viewable as a tiny QT movie via my site, encoded and uploaded it according to the instructions. And the results are excellent. So I tried re-encoding One Good Yank and the clip I call DrunkStagger and uploaded them as well. That stuttery motion I complained about earlier in One Good Yank... completely gone!! I'll post those two below as well.


Tuesday, February 01, 2011

A Forest Grows

P1020968


I've been honing my photography skills, getting ready to start shooting soon on the bar flick. A lot has happened lately around here that all contributes to why my images are looking better... I'll summarize in this post what the main factors are.


forest

First, I've installed some boom arms, one type of which I detailed in my last post. I got pretty frustrated with the flimsy mic stands though, so I went looking for something better that wouldn't cost as much as a professional C stand and grip equipment.

Man - I'll tell ya what... I love all the posters surrounding me here in the Darkstudio, but it sure does make it hard to take pictures of the studio itself or anything in it! All that busy, colorful imagery tends to overwhelm the pics. I hope you can see the forest of rods and extensions coming down from the ceiling. Click on the image to see it at Flickr, then click Actions > View All Sizes to see it larger. Or actually, once you get there, just click on the pic itself to see it enlarged against a grey background... looks much better to me.


linked arms

Hope you can make it out against Kong's flank here, but I found these awesome little extension rods made for mic stands that clamp onto any rod up to maybe 2" diameter. They're pretty short, only 7 inches long, but they're sturdy and have a big toothed clamp wheel, very much like an actual grip clamp. It seems quite strong... a heck of a lot more secure than any joint on those mic stands I put up the other day! And as you can see in the pic, you can link them together if you want to get lights exactly where you need them. These are clamped onto one of the simple wood dowel extensions I made some time go (I painted all the wooden parts black... makes everything look all shiny and professional). These are called OnStage Stands Mini Boom Arms and will only set you back $12.99 each. Mmmm... you know what... they were $11.99 when I bought mine about a week ago...


Next, the really BIG addition to the studio, which just came in today...

monster stand

The Cowboy Studio Pro Light Stand and Boom. Looking at the pics on Amazon, I thought it was about the same size as the little lightweight camera tripods I'm used to, but NO!!!! This thing is HUGE!! As you can see, I've got it practically up against the ceiling, and it could go a bit higher. The tubing is thick and sturdy... the fittings are plastic, but solid and made very much like the fittings on real pro grip gear. It's basically a lightweight budget version of a professional C stand. The extending boom arm is so long, it can reach all the way across my set table, and can be height adjusted to anywhere from table height to ceiling. This thing is so beefy and sturdy compared to any other lightbearing arm here in the studio, I think I might just get another one and retire the frustrating mic stands. It cost about $60... just about twice what one of the mic stand rigs costs if you include the price of the 3 clamps needed to make them work.

Ok, but enough about grip equipment or cheap knockoffs thereof.

The other main factor in improving my shots is three books I bought. I'll give my thoughts on each below...


The Filmmaker's Eye: learning (and breaking) the rules of cinematic composition Gustavo Mercado


THE best book I've encountered about cinematic composition.

Buy it.

No, really... what are you waiting for? BUY IT!!!


DSLR Cinema: Crafting the Film Look with Video Kurt Lancaster


I can't rate this one nearly as high as the last - large parts of it feel more like infommercials for specific products and glowing praise for a small group of people associated with the early advent of DSLR Cinema that hatched with the release of the Canon 5D Mk2 (1st DSLR with full HD video). 

However, that said, I was immensely inspired by it, and by the videos I sought out on youtube such as Vincent LaForet's seminal DSLR video tour-de-force Reverie:


... And the Making-of for it:


Also, loads of good info about how to get the best image quality from a DSLR camera that I was unaware of (and most of which also works with a DSLR-like camera such as my Lumix DMC-FZ50). 


and finally, there's 


Motion Picture and Video Lighting, Second Edition Blaine Brown


I bought this one hoping to find another good book about general lighting techniques that I can recommend, because my former choice, Matters of Light and Depth by Ross Lowell is now a textbook and has increased significantly in price. I was rather disappointed though... this book isn't nearly as good as far as I'm concerned. The main emphasis seems to be on lighting equipment and on the breakdown of jobs on a professional lighting crew, with very little useful information about how to actually create good lighting. There is some such info, but not as much as I'd like. I'd say pass on this one and just shell out for Matters of Light and Depth. Or pick another highly recommended lighting book on Amazon... it'll probably be just as good if not better.

Whew! This has turned into a massive post! I'll close out with another of my recent pics inspired by these books and made thanks to the newfound ability to place lights wherever I want:

Cavebuster