Wednesday, September 13, 2006

Two more

Photobucket - Video and Image Hosting

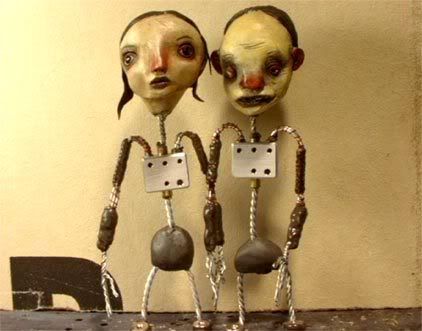
It's Betty and Hoppy. Betty doesn't need tiedowns in her feet because she'll remain seated throughout the entire performance, and Hoppy... well, he needs tie-downs all over because he likes to bounce off the walls and ceiling a lot. He's a bit wired.

This isn't my progress report for today, just wanted to post last night's work and put names to the faces. I think I'll make a new body for Hoppy.... I wanted the legs ridiculously short, but I think they're too short! Man, when I think about how painstaking this has been because of the aluminum chest blocks.... I could have made all these armatures in a few days if they were all simple one-piece designs, and I would have been able to more freely design them. I think in the future I'll go with much simpler armatures and use smaller nuts (regular hex nuts or square nuts) for the tie-downs. Or better yet just drill and tap some aluminum plates. And I wish I had used thinner nails for the bones. Those forearms especially get pretty thick in paces.... that's gonna be a bitch later.

Also, today I ordered some liquid latex from Monstermakers. After all my experimenting with the Dragonskin, I think I'm going to use latex buildup instead, because it's so much easier to paint. I also ordered a very interesting product I've never tried called Latex Softening Agent. Should be fun to play around with anyway.

Tuesday, September 12, 2006

Day 10 - wiretech talk

Photobucket - Video and Image Hosting
Veronica is a barmaid at Cosmo's tavern. That's Cosmo beside her. Oh, he now has the lower body I originally made for Huck... the weird long torso thing works better on him (partly because he'll be wearning an apron and standing behind the bar most of the time!).

I'd like to walk you through the process I use to make the lower bodies. There are a few techniques I want to share that I've picked up over the years... and trust me, I made a lot of mistakes along the way and learned a lot of what not to do!

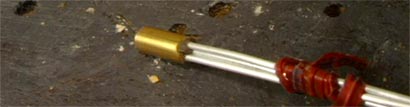
For starters, here's the way I lock the wires into the little pieces of tubing:


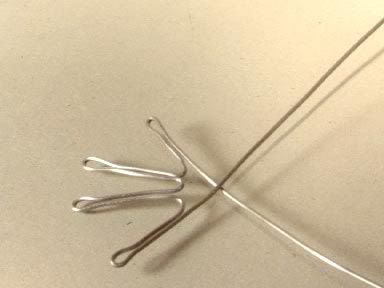
I always like to make some kind of hook or loop in a wire where it will be embedded in epoxy - this creates an actual physical bond, a mechanical join that is much stronger than the adhesive itself. A straight wire embedded in a block of epoxy can easily turn or even pull straight out. I defy anyone to spin these wires inside the tubing, or to pull them out!

Every bend you put in a wire should serve some purpose... often it can serve two or more at the same time. By making these two little hooks I effectively double the thickness of the wire inside the tubing, almost filling the available space, as well as creating that physical lock.


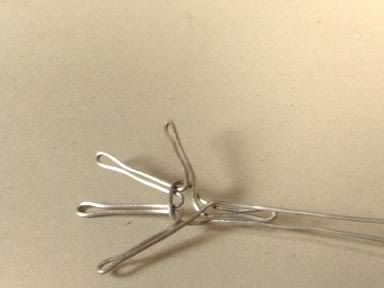
Here I've added a third wire (no hook in this one... I find three hooks just won't fit inside the tubing). The original pair of wires are each about two feet long, the third one is only about 5 inches. You'll see why in a minute. Everything is kwickwelded solidly in place.


I wrap the short wire around at the point where the pelvis is to be located. I only touch the wire with my fingers when I'm bending and twisting it.... you don't want to put any nicks in it by working it with pliers or anything. Every nick is a weak point where the wire can easily break during animation. But it is ok to use pliers in areas where the wires will be embedded in epoxy, like here or when I made the loops. No way I could do THAT with my bare handses!


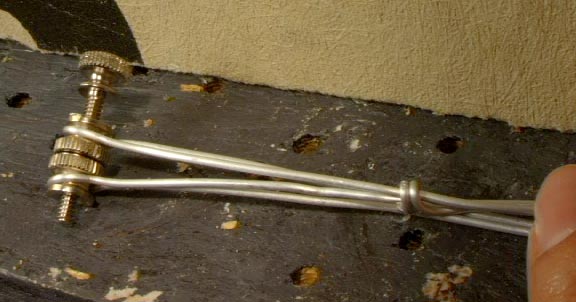
I mark the length I want a leg to be and place a thumb nut there that has been filed around the groove to rough it up so the epoxy can find purchase.


This is my clever little trick to make sure the legs are exactly the same length (just thought of it now... this is the first time I've used it). I used a thumb screw to secure another thumb nut to the first one, then wrap the wire around it the same way. Once this is done I remove the screw.


Hope you can make out what's going on here. What I did was bend each wire down the other leg, so each leg now has three wires. I wrapped the wires around the thumb nuts... there's just enough room for two loops of wire there. Then I tie the wires off as you can see and cut off the excess making sure to use the pliers to tuck the cut end nicely down where it won't poke out and cause any trouble. It will be embedded in kwikweld in a moment. All that's left then is to kwikweld the thumb nuts securely in place and mix up a blob of epoxy putty for the pelvis block. I use a steel filled epoxy putty that happens to look just like the (also steel-filled) kwikweld. Once everything is all set up then I twist the legs and the spine, which has the effect of tightening everything down nicely. Obviously this was for a puppet that doesn't have the rectal tiedown for barstool attachment. If it did I would have attached the thumb nut to the short wire at the beginning of the process. I could have made this in about 15 minutes, but making the tutorial added about an hour! I've got two more bodies to make... I'll see if I can get them done yet tonight before hitting the sack. Really getting tired of messing with all this wire and goop!

****


Update:

Finished the last two... now all the armatures are complete except for the secret puppet.

Monday, September 11, 2006

Day 9 - one more lower body done

That pretty much says it all. Sorry, no pic tonight. 3 more to go, and then I unleash the secret puppet. Yes, I said secret puppet. Anyone who does math (and cares enough to actually pay attention to all my prattling) would have noticed a few discrepancies in my posts. I said Scott Radke sculpted 8 heads for me, and yet I've only ever shown 7. I'm saving this one for last because it's going to tax my puppetsmithing skills to the utmost... I needed as much paractice as I could get before tackling this one! Ok... cliffhanger-ish enough?

Sunday, September 10, 2006

3 wise guys

Photobucket - Video and Image Hosting
I tested Tom a bit and decided the legs and spine are strong enough after all. He wobbles a bit because the head is so freakin' heavy, but he can hold himself up on one leg in a pretty extreme pose... leaning all the way over till his head is like an inch from the table. Essentially all that twisted wire is like a long spring under the heavy bobblehead, so it means after re-positioning the puppets for each frame I'll just have to wait till they stop bobbling!

So I went ahead and made Huck the same way... no leg bones. I still need to make some epoxy putty pelvic blocks for them, to secure all that wire together at the groinal area and to provide a solid 'grab point' that can be easily felt and held under the padding and the clothes. It's always a good idea to have the chest and pelvis be big solid blocks inside the puppet so you can easily move them.

Day 8 - halfway point and my first completed armature

Photobucket - Video and Image Hosting
Tom says hi. He has three wires in his spine and each leg, but he thinks he might need another one. Since there are no bones there the wire is weaker. I was originally planning to put bones in his legs, but geez... they're just so short!! I had planned to test out my new hybrid method, which involves leaving the wires untwisted only where the bones will lay... then adding the bones using the thread-wrapping/Kwikweld method as before (only the thread doesn't extend past the ends of the bone), and then I was going to twist in between bones. That way the straight wire makes a nice trough for the bone to lay in, keeping things neat and compact, and twisting tightens everything down and does away with... um... that complicated problem that I can't seem to explain very well. ;)

I think I'll go ahead and put tiny little bones in Huck's legs when I make him later tonight. Huck is Tom's friend and the tallest of the puppets.

Saturday, September 09, 2006

Day 7 - A show of Hands

Ok well, that title would work better if I actually posted a pic showing all the puppets with their hands finished and attached, but I'm beat. I worked for like 4 straight hours tonight, listening to Kansas for most of it. I can't tell you how good it felt to finish up that last hand!

Tomorrow.... lower bodies. The end is in sight for these armatures... and in the next few days I foam them and get ready to start tailoring them up.

Friday, September 08, 2006

Day 6... didn't do nuttin' honey.

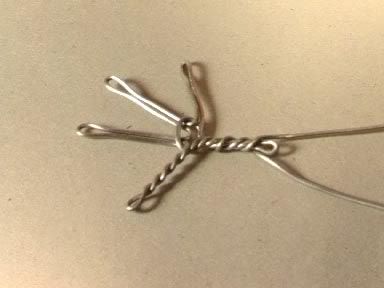
Well, not quite true... I made one hand, and a tutorial:
Photobucket - Video and Image Hosting

And here's the promised writeup about the problem I discovered with the thread-wrapped wire method of armature construction.
Photobucket - Video and Image Hosting
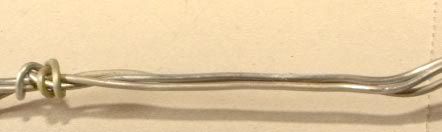
See... this pic shows the most comfortablest way for three wires to nestle together.... the cross-section would look triangular. And I've found three 1/16" Almaloy wires is a perfect combo for most parts of the puppets I'm making. The triangular configuration is a thing of beauty and much economy.... it's the way they naturally want to lay anyway when you start wrapping... it's a lot harder to get them to lay out side by side (flat cross-section like a ribbon).
Photobucket - Video and Image Hosting
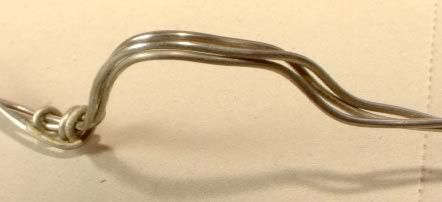
BUT... Here's the problem with it. All I did was bend the wire-thing here, and see what happened? The wire that was behind the other two popped out between them, and now it's gone from triangular profile to flat profile. This is what happens inside the puppet when you bend a joint if the wires were in triangular configuration to start with... and to complicate matters, even if you originally made it in flat configuration, it will shift from handling. In other words, it's constantly shifting between the two configurations...... and this causes stress. I can tell by the popping sound I hear when it happens! At first I didn't know what was going on... I though something was breaking, but obviously nothing was.... so I examined it closely and bent it back and forth a few times, and then I saw it happen. See, the problem is that when the wires are in triangular configuration and you bend them, the wire in the back would need to stretch... or else pop through between the other two. When you go with the good old fashioned twisted wire method, they're sort of springlike, so the back one actually can stretch a bit, and the front ones can compress a little too. Crazy stuff!

This doesn't mean the thread-wrapping method is crap or anything... it's just a different alternative. I believe both methods have their strengths and weaknesses (a bit too tired to pontificate any deeper on it right now). And the popping-through thing doesn't jhappen all the time, possibly it's only on certain joints depending on how they were made, I'm not sure. It's just something I noticed and wanted to share.