
The words of Pat Zung are echoing insidiously through my head:
"I'm skeptical about pouring silicone in the two halves and shutting them. this works great for hard molds and foam but I think it may be difficult with silicone. You may end up with large air bubbles that will combine and make large unfilled cavities"
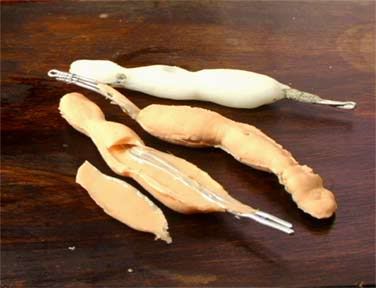
Wow, was he ever right! I've now poured 3 test arms, zeroing in my technique each time, and still I'm getting huge voids. The third one seemed like it should have worked.... and it might still be possible to make it work, possibly with some patching afterwards.... here's the method I devised:
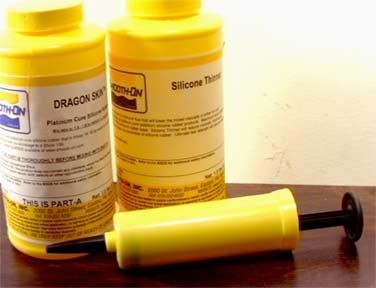
I first mixed up a batch of Dragonskin with some flesh pigment in it, no softener yet. I use this thicker mix to coat the armature with... I found the softened silicone is so thin it just runs off. I think I'll even try to thicken it with some Cabosil or something next time. So, after coating the armature I then add my silicone fluid (I'm saving the Slacker for actual puppet production). Now I pour some into each mold half. One half is deeper than the other, and this is the key to my approach.... I wanted to avoid slopping liquid silicone when I flip half the mold onto the other half, so I completely fill the shallower mold, and only partially fill the deeper one. Now put both halves into the oven along with the armature and bake for a half hour. When I pull it out I lay the armature in the deeper half and pour silicone over it until it's flush with the top. I use the same batch of silicone for this... the stuff in the cup won't cure for at least 5 hours, so you get the exact same color and softness. Now you just flip the (already fully cured) shallower half onto the deeper one with the armature in it... no sloppy silicone to drip and run everywhere.
But you can see the results above. Not good. You'd need to actually overfill the deeper half a little to make this work, and I don't think you can do it. At least I'm getting tired of trying and failing. But a solution is at hand. It just so happens I found an injection gun in the trash at work!!!
I have no idea what this was used for, and really I don't want to know, I just hope it doesn't have some chemical residue in it that will inhibit the Dragonskin. The really insane thing is, it's even the same color as the Smooth-On jars! Now that I've worked with the Dragonskin a bit and discovered it's just another silicone, it no longer seems like some mythical substance that requires wizardly powers to use, and I now feel like injection molds are entirely within my grasp. In fact, now that I think about it, I've actually used injection molds before... long ago in my childhood. I had a Creepy Crawlers set! I believe the actual Creepy Crawlers were just one-piece steel molds that you fill with the Plasti-Goop and cook to make little rubber insects and stuff, but there was somthing similar... seems like it was 2-piece molds for little soldiers or something, and you injected the rubber through a conical-tipped bottle into a hole in the mold. Hey, that makes it all seem so much easier... this won't be my first time!
19 comments:
Mike, Mike, Mike... Whata yer doing over there?!
kidding.
That's great news. You may want to do some little cube tests of your mix with Cabosil (wear proper mask, fine fibers not for lungs) to see whether you like the texture.
I recently bought some colors of non-tox Creepy Crawlers Official Plasti-Goop Compoud by ToyMax, Inc. to use in the Pink Snail. So the toy is STILL going strong for the youngins'. Hoping a strong light bulb will cure it tho as I don't want to buy an oven for it.
Oh Wow,
I remember creepy crawlers, those were so much fun.
You poured the goop into a little metal 1 part mold and heated it up I think. I remember the centipede kind of character and some other bugs. I haven't thought about that since I was 8 years old.
I thought with silicon you didn't need an injection gun?
I have never used this stuff so I don't really know, but I thought you could just stand your closed mold up on one end and pour it in. Just like making popsicles.
Isn't the silicon thin enough to flow into the small features of the mold?
Ahhhh, Creepy Crawlers....the boy's version of the EasyBake oven...my sister would make brownies and my brother and I would make bugs....classic....
Hey, don't give up yet...keep trying...the first arm looks best, what did you do different there? Maybe try a different approach...I don't know, I can't wait to get my hands on some of this stuff to experiment, I tend to learn more by doing than by reading and watching...thanks again for all the info...
Rock'n'roll... It is so excellent to get to see your tests -- again, thank you SO much for sharing these!
I just last night ordered the Tom McLaughlin "Silicone Art" book from Burman (thanks for the tip!). And I ordered a whole bunch of stainless steel balls from smallparts.com (multiple sizes, primarily 1/4"). It's likely that I'll put in an order to Smooth-On sometime this week...
From your pics and descriptions, it looks like you ordered this:
* dragon skin
* slacker
* silicone thinner
* sil-poxy
* silc pig
I know you also got some silicone oil... Is there anything else that you picked up? You mentioned that a few items were coming from Burman...?
LOL!
Ouch Shelley! ;)
The texture of the cabomix doesn't really matter, that part would only be going on the armature. I think a light bulb should work for curing the rubber.
Mark, I can't remember what I had that used a 2 part mold... it's just a dim memory. It seems like little toy soldier dudes or something. Might be a false memory too. Do I even remember putting little wires into the molds? Curse these tricky memory-fantasies!
It might work to just pour in the silicone, at least with something simple like my arm and neck molds. It's definitely thin enough, especially after you add the softener. But the injection gun would add pressure and make sure (hopefully) to fill any difficult areas.
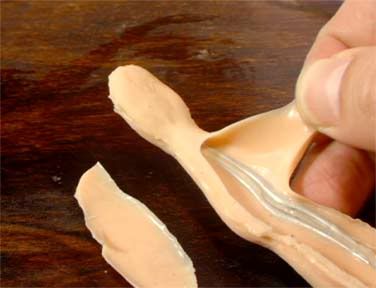
Jeffrey, yeah, the first arm is definitely the best! The follow-ups were an attempt on my part to avoid getting silicone spilled onto the mold so I can close it completley, so I guess I got timid about overfilling it. One nice thing is that if you spill some during the first filling of the open mold halves you can trim it off with an X-Acto after it's cured up. On the middle arm (the scalloped-looking one in the top pic) I glued the voids shut with some more dragonskin, but the only way I could hold it together was by wrapping a thin wire around it, resulting in permenent deformation and scalloped edges. The adhesion is fantastic though... just gotta find a good way to gently hold it all together.
Sven... right on about the list. That stuff all came from Smooth-on. Silicone thinner *IS* silicone oil... I suppose I use the terms interchangeably. I sometimes also say silicone fluid or softener (generic term that also covers Slacker). From Burman's I got the book, some D-Limonene and some clear makeup powder. www.sculpt.com also has the Silicone Art book (which is a bit of a surprize when it comes in... it's not a book so much as a shop manual, you know, loose pages bound together with a plastic ring-thing, no pictures... looks like it was mimeographed or something - but so informative it's well worth the price ten times over).
I already had my Ultra-cal and my White Clay, which came I believe from Monstermakers.... can't believe the clay is still useable after two years! Oh, and my Chavant NSP came from The Compleat Sculptor.
Thanks, Mike!
I'm surprised that the thinner and the oil are the same thing. I recently got some thinner for my mold-making silicone; guess I'm going to have to look at its documentation more carefully.
Do you know if the D-Limonene you got is in a pure form?
...I know that D-Limonene is the main ingredient in Citrisolve, which is easy to come by. I've been wondering for a while if Citrisolve can be used as an equivalent. (Particularly with regards to creating silicone-base paints.)
I believe the D-Limonene is pure, it's a bit hard to tell though. The label is printed as if on a home computer printer, and all it says is "D-Limonene (Orange Solvent)". Then in fine print it says For Industrial Use Only... Keep Tightly Closed When Not In Use.
I don't know if there's anything in the cleaner that would mess it up for use as a paint solvent. Would be worth testing I suppose.
Hmmmmmm .... first time checking your slickified, template-type blogger set-up you got here. I liked the more organic, hand-made feel of ol' Darkstrider.net.
IMO, Stop Mo puppets made to "live" on film (well not actual movie film), and archivable quality is not my concern. If I want a somewhat "permanent puppet", or for whatever other reason, then I would maybe go through the trouble and make a duplicate puppet with the almost last-forever materials. A pro stop mo animator doing pro work, if needed, eventually slices up the puppet to access the joints and adjust tension, while animating. So puppet can sometimes get pretty trashed. I know for newbies/beginners, this can be devastating. Hey,just deal with it! It's the harsh cruel reality of Stop Mo ;)
To me, good ol' Hot Cure Foam Rubber Latex is sooooo user friendly (light weight, easily paintable & repairable, also cost-effective) once you get over the learning curve hump. Of course. if one is really arteestically picky and seeking some kind of translucency factor or how material bends, deforms, etc., then of course silicone or other materials are obvious options. But it seems there is always a trade-off in techniques or other areas of difficulty.
Attempting to reproduce a somewhat photoreal harryhausenesque creature, alien, monster, etc., with "Silicone", would be more difficult & time consuming (at least for me) compared to the foam hot latex. Just painting the silicone with creature-like earthy tones, then if you had to repair later.... I just don't know. I could see, silicone is good for one color/shade skin tones. I know silicone used in other areas of special effects but like I said, it has it's own trade-offs and idiocyncrasies All merely my views. Continue on with your research, bro.
-LIO
Hey Lionel... thanks for checking in on me! I can't clearly remembe ranymore exactly whY I decided to try silicone... just curiosity mostly I think, from reading so much about it, and the idea that it doesn't wrinkle up like the foam does. I think it'll be as easy to paint as foam really, haven't tried it yet though. Just mix up a batch of Dragonskin, add some softener and some D-Limonene along with the coloring agent of your choice, and paint away. It glues itself together beautifully and I think it'll self-patch nicely too.
Now I've tried both, though my foam latex attempt wasn't successful. In the future I'll try it again, but it just seems so touchy with humidity issues, gelling issues, contamination etc, and the paint I used on it wants to peel off with a little use.
I don't really care about the longevity, as long as it lasts through the production. The movie itself is the lasting part IMO... the puppet needs to be extremely flexible, which isn't compatible with longevity usually.
Yeah, I prefer the lok of the Darkstrider hand-coded blog, but this is just so much simpler... comments and archiving are completely automatic. I could probably alter the look to some extent and get it to look more like the old blog if I want... maybe at some point. But the aesthetic issue is less important than the content. Like you said... a tradeoff.
Hey, and now I'm a full member of the Black Web Page Conspiracy! ; )
You can have your Blogger *and* your original site at the same time.
Here is my test of taking Darkmatter content and wrapping my code around it. It looks a bit ugly because I just ripped it onto my page and the stylesheet is clashing. But you get the idea.
http://www.objectsatrest.org/screening/test.htm
Just go here and follow the directions and copy the 3 lines of code on your traditional web page to have the best of both worlds.
http://www.rss-to-javascript.com/p/138.html
OK, see, LIO's got me thinking foam again...damnit!
And DG, thanks for that link! Very helpful, and sorta cool to see Mike's blogging on your template.....worlds collide...
One thing foam latex definitely has over silicone is hands. I've always used fun-tac or sticky wax to stick things to puppet hands (like Buster's hat etc), but I don't think it would work with silicone. Nothing sticks to it!
Thanks for the demo DG. Do you happen to know a way to use a BG image on a blog? I've looked at the template, but it's gibberish to me.
Hey Uba--
I know why *I* want to use dragon skin... It's what Henry Selick uses now -- and he's the man in charge of the gig I want. ;-)
I can't knock foam latex, having not tried it yet, but I think you and I may have a similar problem... Humidity. Portland's famous for its rain. As I understand it, New Orleans has some pretty muggy weather too -- yes? I have a suspicion that neither you nor I are in ideal climates for the material.
yes, extremely muggy, like walking through a sauna....its horrible...I'd trade it any day for constant rain and cold ;)
It appears that you have the blog background image and other styles figured out and working on this site. Me likes it. 8-)
Yeah DG, when I really looked into it, the BG, link and text functions are basically the same as in regular HTML. I did a quick Google and found the right code to enter for the image. Funny part is, that was the first part I tried to do, but by the time I got it working right I had everything else figured out.
Now, one of these days I'll see about getting access into my site again so I can try out that code to embed the blog there....
I like the way your site is looking!
Thanx. The Cap'n is happy to have a new home fer his homely mug.
Post a Comment