Showing posts with label silicone. Show all posts

Tuesday, October 23, 2007

Hittin the bottle - plus possible Prometheus prerelease????!!!!

Photo Sharing and Video Hosting at Photobucket

Wow, did you ever notice how everybody uses the most worn out cliches for their blog titles? And also (allegedly) alliteration. Oh well... whatever you can come up with in about 12 seconds I suppose. Anywho, like I mentioned last post, I've been busy making bottles lately. Here you can see the first few castings, alongside the original sculpts. I've improved my technology along the way.... the first few bottles came out pretty rough-surfaced, covered with fingerprints that I couldn't see in the sculpts, so I started sanding them down and gloss-coating. They came out much better, though I wish I had caught it before baking the sculpts so's I could have brushed them down a lot smoother (beats the hell out of all that sanding, which doesn't get everything anyway). And don't ask about the colors.... they're crazy I know. Only the dark green wine bottle looks right to me. I'll get some glass paint and try to fix them.

Photo Sharing and Video Hosting at Photobucket
Here are the molds, cobbled together from whatever I could find that looked the right size (some of them had to be extended slightly with epoxy putty - the containers weren't quite tall enough). I'm using EasyCast clear casting epoxy, made by Castin' Craft. I originally went in search of their more familiar polyester resin, which stinks to high heaven (it's the same stuff used in fiberglass) and discovered this odor-free 1:1 ratio epoxy, which sounds a lot better to me (I always hated trying to figure out how many drops of catalyst to add to that polyester crap!). I got their mold release, used it on most of these, and tried one without.... turns out you don't need it in a silicone mold. Good, because it's a pain to apply!

Photo Sharing and Video Hosting at Photobucket
Here's the biggest problem.... tiny bubbles. Thousands of them! The instructions said this can be caused by using the epoxy cold and to warm it in hot tap water for 10 minutes to avoid it. It doesn't work! At least for me it didn't. But I guess I can live with it. Heck, bubbles almost look right in beer or champagne bottles (only they shouldn't be frozen in place!)

Here's a nice little trick I discovered too.... after they set up completely (which takes three full days, during which time they're like soft, pliable and very sticky gummybears!) and you've cleaned up the castings, hit em with a coat or two of clear gloss spray. It takes off any dullness and makes them shine like nobody's business. Next up, making labels and painting the caps.

In related news (sort of) I just found this on the Bright Eye Pictures website:

"I hope to have the DVD (Prometheus' Garden) ready for sale on the Bright Eye Pictures site..... by December 1, 2007. "

Posted the 1st of September, but as yet there's no mention of it on the site, or on Bickford's site. Getting excited though (and I also just found out there's a lot of cool stuff on the Bright Eye site.... goin to check it out as soon as I hit Post).

Tuesday, June 20, 2006

Intrinsic coloring test and a new casting technique

Photobucket - Video and Image Hosting

I asked about the bubbles on both the Sculptor's Forum and SMA, and got some good answers. The concensus is that the bubbles were already there, just under the surface, and that the solvent softened up the silicone enough so when I rubbed over it I broke right through the thin skin. Apparently when you mix the catalyst into the silicone you create lots of tiny little micro-bubbles, and they stay in the mix, just under the surface, or they can rise to the surface. My thought is that I avoided similar problems on the other arm castings because of the way I made them... I partially filled each mold half and baked them separately, and the bubbles rose to the surface, which was toward the center of the arm. But now I've tried my next experiment, which is getting close to the results I want for the actual puppets. I'll detail the process, partly so I can remember, and also to help anyone following in my footsteps.

I started by painting in a layer of pure Dragonskin, no softener added, no pigmets. This is much thicker than the softened silicone, and will stay in place on the mold walls rather than just run right to the bottom, plus is translucent, so the pastel powder will show through. It's important to actually brush it into the mold to break up any bubbles. As long as you have this thin skin it doesn't matter if there are bubbles inside... after all, that's what foam latex is, just a thin skin and inside it looks like a sponge. Ok, so with a thin skin brushed up in the mold halves, I then ground up some pastels on my trusty sandpaper, a few colors to create the mix I wanted, and I sort of tapped on the piece of sandpaper while holding it tilted over the mold halves, so pastel powder sprinkled down into them. I was hoping it would stick to the silicone, but it really didn't, so I decided I needed to paint another layer behind it. This got really messy, as it sort of gummed up and tried to pull the first layer out and ther pastel dust kind of turned into a bunch of thick lumps. Maybe next time I need to cure the outer layer first. But it worked surprisingly well in spite of this.

At this point I put both halves in the oven to cure for half an hour. I didn't bother making an armature for this one, I just wanted to test intrinsic painting using pastels and a solid pour technique for filling the mold. In my first few attempts I tried to fill each half of the mold and then slap them together, which never quite worked the way it does with foam latex, which is light and fluffy and holds its consistency... so this time I cut a channel to pour silicone into. After pulling the mold halves out of the oven with the cured skin inside I strapped them together (first I had to trim a little stray silicone out that would have kept them from closing completely) and then I poured the rest of the silicone in, after adding the thinner and some pigment, white with just a touch of flesh. I was really expecting silicone to come pouring out the bottom of the mold, or maybe to wait until I stood it in the oven and then run out onto the bottom heating element, but amazingly it held! And when I demolded it 30 minutes later, I had the best casting yet.

Photobucket - Video and Image Hosting

Here you can see one problem I still want to address. Because the skin is made with unthinned silicone and the stuff inside is much softer, it has a tendency to wrinke. But there might be a nice solution.... possibly if I mix the pastel dust right into the initial layer of silicone it might become thick enough to stay put on the mold walls, meaning that I can use thinned silicone even for the skin. A little more experimentation is called for, then it's on to actually making some puppet parts!

*EDIT*
Wow, I can really lay on the blablabla without saying the important stuff, can't I? The sweet thing about this intrinsic coloring technique is that now I don't need to spray deadly toxic solvents all over in the basement. That's all I was trying to say.

Friday, June 16, 2006

1st painting experiment

Photobucket - Video and Image Hosting

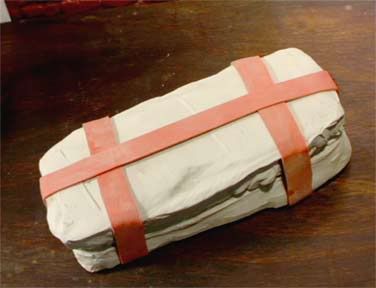
The first Dragonskin painting experiment is a success... sort of. It was quite an experience, and involved dredging up materials and equipment bought in some cases decades ago. I mostly wanted to try something ToxicPapa suggested, which is doing the coloring with pastels and then sealing it with a coat of clear Dragonskin thinned down with a solvent and applied with an airbrush. Gathering my materials I had to dig through cabinets and boxes I haven't looked into in many years... for instance the respirator I bought when I first started making airbrushed T-shirts but never ended up using. Glad I kept it sealed away in the original packaging, with instructions still intact! I also dug out a couple boxes of pastels I had bought and used only a few times. And the Paashe 'H' airbrush I picked up used from some guy at work long ago... this was the first time it's seen use since then. First time I've fired up my compressor in a few years too. And the worst part was the fan.... I wanted to set up a good positive draft through my work area to carry the solvent fumes outside (I haven't set up a Sven-Approved ventilation system yet!). So I trudged up two flights of stairs (several times actually... it was a decent workout) and carried my fan down from my bedroom and had to crawl under the deck, through heavily spider-infested territory in the semi-darkness. The things I do for my art, I tell ya! And these basement windows, they're ancient... iron frames set right into the concrete, no screens.... you just open them wide and let the insects start coming in. I swear, if I do this again It'll either be outside or I'll set up something a lot better.

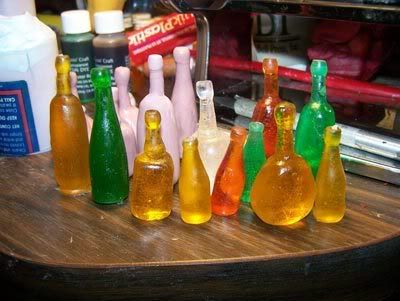
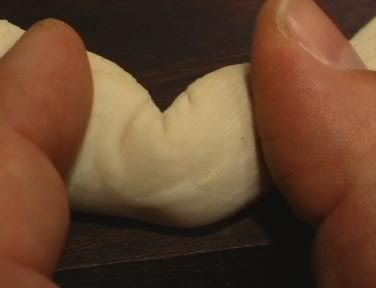
Anyway, back to the real focus of this entry, the painting experiments. I started by grinding up some pastels on a piece of sandpaper and I picked some up on the corner of a paper towel and tapped it onto the silicone arms. They're slightly sticky anyway as really soft silicone will be, but I had powdered them to reduce that. They took the pastels fairly well, but it was pretty hard to work with. Not at all like a decent pastel paper. But with a little effort I was able to get some very nice gradations and blends. For these arms I don't need much color, just maybe a little red at the elbows and maybe the wrists, and on the fingers when I make the real arms. But I tried to blend colors to approximate the painting Scott Radke did on the heads. Here's the pic again from my old blog at www.darkstrider.net:


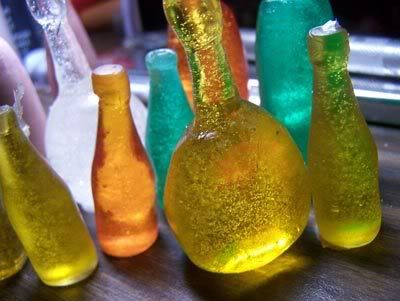
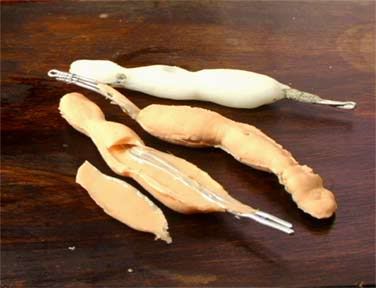
Lots of nice color blending there! Pastels are perfect for those kind of blends, which is why I wanted to try out this technique in particular. I tried a couple of others as well, but they weren't successful for reasons I'll go into in a bit. But back to last night's test. Here's what they came out looking like:

Photobucket - Video and Image Hosting

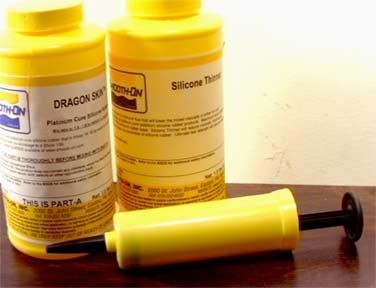
This is actually after sealing with thinned-down Dragonskin and baking for half an hour to speed-cure, but it looks pretty much identical to the way they did before I airbrushed on the rubber. Ok, once I was happy with the results of the pastel application the real fun began. With a growing horde of buzzing things swarming around the light I strapped on my respirator and goggles, feeling like Darth Vader, and cranked up the compressor. I mixed up a small batch of Dragonskin with approximately the same amount of plasticizer (silicone oil) that I used on the arms - about 50%, and then I added a nice big slug of D-Limonene. In his book Silicone Art, Tom McLaughlin recommends using 1 part silicone to 5 parts thinner, so I eyeballed it and mixed it up with my trusty paintbrush handle. Then I poured out a little into my airbrush cup and started spraying it on. If I wasn't wearing the goggles I would have smacked myself on the forehead right then, because I had never used the Paasche H before, and I wasn't sure how to adjust the spray pattern. I should have messed with it first with just some water. But no time for such niceties, so I just learned on the fly. Pretty simple actually. The first thing I noticed is that I couldn't detect the faintest hint of the bitter, eye-burning, throat-burning stench of the solvent. Inside my respirator cocoon I was experiencing a nice spring afternoon in the meadow while around me the buggies were in the gas chamber! Oh, and I had let my dog out a while ago, but the process took quite a while to get underway, so by now she was scratching like mad at the door, adding another layer of anxiety.

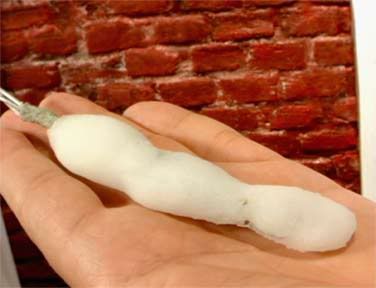
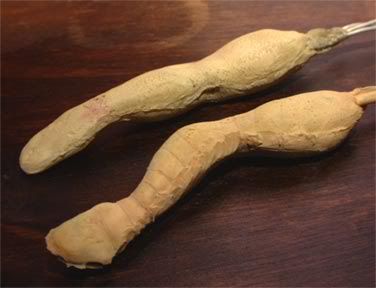
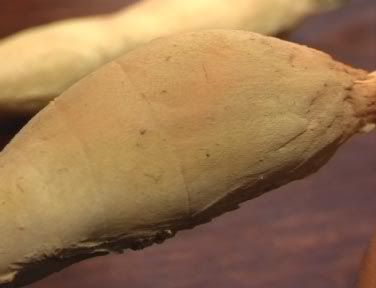
It went quite well, but then it was simply a matter of spraying a coating of clear rubber over my pastel work to seal it. Then I bent the wires into hooks and hung the arms in my convection oven to cure. All told, it was a great success up to this point. But something weird happened that I don't know what to make of. First here's a close-up shot of the "good arm" (paintwise anyway) so you can see the subtle color blending and the nice surface quality. Bear in mind I hadn't trimmed the seam lines before starting. I wish I would have.... it was a mental lapse, but this was just a test of the painting process, so try to ignore the ugly seam lines and other problems.

Photobucket - Video and Image Hosting

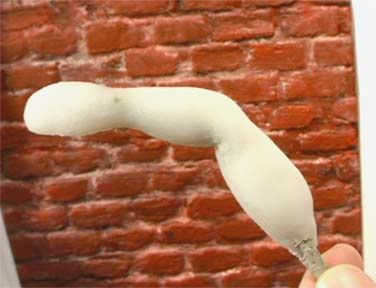
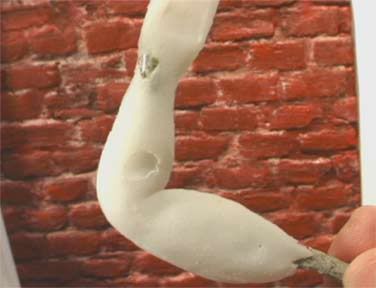
Ok, that was the pink arm - that one seems fine, but the other one - the translucent white one, did something weird:

Photobucket - Video and Image Hosting

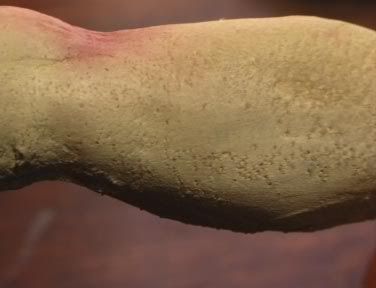
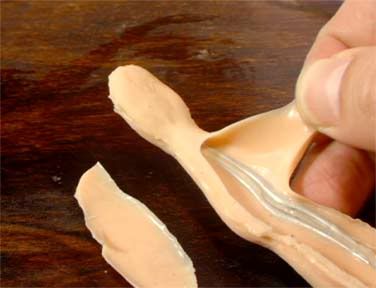
Those little holes weren't there to begin with... they appeared when I rubbed my thumb over it to test the paint. I wanted to make sure it wouldn't smear or peel off the way PAX paint can on foam latex. And it didn't at all... the paint seems to have bonded completely and become an integral part of the rubber. But when I rubbed my thumb over it fairly hard those little bubbles appeared. I could feel it happening too. Weird. I tried it on the other arm and it doesn't happen to that one. Weird. If anybody has any idea what could cause that, by all means please comment! I need to ask a few silicone gurus about it.

Here's something I just noticed after taking these pics that might explain it:

Photobucket - Video and Image Hosting

See the smudges on the table? They came from the silicone arms! Funny, they feel completely dry. But somehow the pigment is coming off. I thought maybe I just missed sme spots with my rubber selaing coat, but it smears off like that all over, and it seems kind of liquid/gooey (though you can't feel it at all on your fingers). So it seems like the Dragonskin just isn't fully cured. Possibly the added solvent slows the cure time. And I've thought of a possibility for the little holes in the one arm - maybe there was just too much pastel powder piled up. I know you're not supposed to put it on thick at all... if you want to build up a few layers you're supposed to seal between each layer. I don't know though... could be any number of things.

I tried a couple other techniques too while I was all set up. One was to mix powdered pastels directly into the thinned Dragonskin, and one was to add some oil paint to it. Neither worked for me. I'm sure I didn't do it right though... Tom McLaughlin recommends grinding pastels into the rubber with a pestle and mortar and using a very specific ratio, but I just sprinkled some in and mixed it with my paintbrush handle. I got a spotty, grainy mess when I tried to spray it. I got much the same when I tried oil paint (actually alkyd, which is oil paint in a synthetic Alkyd binder so it dries faster). With better measuring and grinding I'm sure it would work better. But these were just afterthoughts tacked on to my main experiment, and the buggies were getting thick and heavy by now, and the dog had nearly scratched through the door, so I wrapped it up. It was pretty scary taking off the respirator, I knew the basement was a gas chamber, especially after cleaning out the airbrush which involves spraying pure solvent through it followed by denatured alcohol. I wiped off every surface I had touched with the stinky stuff and put the paper towels in plastic bags that I tied shut. But sure enough, when I peeled off the respirator, it stank to high heaven! I was afraid the smell would linger for a long time... days or weeks even, but tonight it's almost entirely gone. I would have blogged this last night, but needless to say I had to vacate the basment for the rest of the night.

Friday, June 09, 2006

Creepy Crawlers

Photobucket - Video and Image Hosting

Photobucket - Video and Image Hosting

The words of Pat Zung are echoing insidiously through my head:

"I'm skeptical about pouring silicone in the two halves and shutting them. this works great for hard molds and foam but I think it may be difficult with silicone. You may end up with large air bubbles that will combine and make large unfilled cavities"

Wow, was he ever right! I've now poured 3 test arms, zeroing in my technique each time, and still I'm getting huge voids. The third one seemed like it should have worked.... and it might still be possible to make it work, possibly with some patching afterwards.... here's the method I devised:

I first mixed up a batch of Dragonskin with some flesh pigment in it, no softener yet. I use this thicker mix to coat the armature with... I found the softened silicone is so thin it just runs off. I think I'll even try to thicken it with some Cabosil or something next time. So, after coating the armature I then add my silicone fluid (I'm saving the Slacker for actual puppet production). Now I pour some into each mold half. One half is deeper than the other, and this is the key to my approach.... I wanted to avoid slopping liquid silicone when I flip half the mold onto the other half, so I completely fill the shallower mold, and only partially fill the deeper one. Now put both halves into the oven along with the armature and bake for a half hour. When I pull it out I lay the armature in the deeper half and pour silicone over it until it's flush with the top. I use the same batch of silicone for this... the stuff in the cup won't cure for at least 5 hours, so you get the exact same color and softness. Now you just flip the (already fully cured) shallower half onto the deeper one with the armature in it... no sloppy silicone to drip and run everywhere.

But you can see the results above. Not good. You'd need to actually overfill the deeper half a little to make this work, and I don't think you can do it. At least I'm getting tired of trying and failing. But a solution is at hand. It just so happens I found an injection gun in the trash at work!!!

Photobucket - Video and Image Hosting

I have no idea what this was used for, and really I don't want to know, I just hope it doesn't have some chemical residue in it that will inhibit the Dragonskin. The really insane thing is, it's even the same color as the Smooth-On jars! Now that I've worked with the Dragonskin a bit and discovered it's just another silicone, it no longer seems like some mythical substance that requires wizardly powers to use, and I now feel like injection molds are entirely within my grasp. In fact, now that I think about it, I've actually used injection molds before... long ago in my childhood. I had a Creepy Crawlers set! I believe the actual Creepy Crawlers were just one-piece steel molds that you fill with the Plasti-Goop and cook to make little rubber insects and stuff, but there was somthing similar... seems like it was 2-piece molds for little soldiers or something, and you injected the rubber through a conical-tipped bottle into a hole in the mold. Hey, that makes it all seem so much easier... this won't be my first time!

Tuesday, June 06, 2006

The Skin is in!

Photobucket - Video and Image Hosting

My Dragonskin and related products have been coming in from various sources for a few days now, and I've been doing some testing. My main supplier has been www.smooth-on.com, but a few assorted odds and ends have come from www.burmanfoam.com (including the incredible resource Silicone Art, a book giving exhaustive detail on casting, molding, tinting, painting, and finishing silicone, as well as a few other tricks). My first test was very simple... I just wanted to test compatibility of the platinum-cure (extremely touchy) Dragonskin silicone with Chavant NSP (a wax-based, non-sulpherated plasticene, designed for use with platinum-cure silicones) and my preferred super-sculpy/premo blend. So I made up two little thimble-sized cups, one from each material, and mixed up a small batch of Dragonskin that I divided into them. I also wanted to test the difference between Silicone Oil and Slacker as a softener, so I added about 50% Slacker into the NSP cup and a similar (actually a bit larger I believe) amount of Silicone Oil into the Sculpy cup. Patrick Zung told me that he's been mixing up his silicone additives lately with "ever increasing reckless abandon", which sounds good to me, as I'm really not a meticulous person and I tend to work rather sloppily. In fact I was a bit worried that my lax working methods (and not exactly clean room environment) might inhibit the cure of the Dragonskin, but I wanted to find out, so I set to work with some reckless abandon of my own. Let me put it this way... if a platinum cure silicone requires me to transform from Oscar Madison to Felix Unger, then it's not for me. The results.... both batches set up perfectly overnight (Dragonskin takes like 8 hours to set up at room temperature). And I do mean reckless abandon... I only used one cup and just poured out approximately equal amounts of parts A and B, and I just totally estimated on the amount of pigment and plasticizer to add. Both samples came out really nice and soft, in fact once you pick them up it's hard to put them down... you want to just idly squeeze and knead them and stretch them out again and again.

Photobucket - Video and Image Hosting


So here's my second test. I wanted to sculpt and mold a simple arm shape with a wire armature inside, to check a number of things:

1) will three strands of 1/16" armature wire be strong enough against the resistance of the silicone? (yes, no problem at all)

2) I wanted to test using a stone mold (Ultracal-30) and waterbased clay dividing wall and make sure neither material adversely affects the cure of the silicone, and to just make sure I was using the right mold release etc. (again, no problems. My mold release was 1 part dishwashing detergent in 2 parts isopropyl alcohol. Happily, no matter how vigorously you mix, it won't foam up!)

3) To see how the silicone acts when animated... will it wrinkle and fold bizarrely, or flex smoothly? (see below for the answer)

4) I also wanted to try the simplest casting method I know of, just filling both halves of the mold with silicone, laying the armature on top of one half, and then slapping them together. Pat Zung voiced reservations about this method and has developed a complicated injection technique that scares me to think about. Happily, my initial test of this simple technique worked like a charm, with one problem that can be easily addressed. See below.

Photobucket - Video and Image Hosting

Simple 2-part Ultracal-30 mold.

Photobucket - Video and Image Hosting

The arm casting is hard to see clearly because I didn't use quite enough white pigment and it came out translucent. I want my puppet parts to be opaque white, over which I'll paint in a technique that I hope will end up looking like the Scott Radke heads.

Photobucket - Video and Image Hosting

You can see the silicone bends very nicely with little or no wrinkling. Very fleshlike in fact. I'm loving this stuff! There are a couple of holes where the armature was touching the mold, in fact there's one right at the elbow joint and a couple at the wrist, and these cause some odd wrinkling and puckering. But I think when I try a two-step process that involves painting a "skin" of silicone into each mold half and onto the armature and letting this set up before filling with more silicone and clamping it together I should be able to conquor this problem. There's also a large air pocket on the underside of the forearm... another problem that should be solved by the skinning technique.

Photobucket - Video and Image Hosting

One of the important things I learned from ToxicPapa is that you can speed up the cure time of Dragonskin dramatically by putting it in a 150 degree oven. It will cure in half an hour rather than overnight. I really like this, better than the idea of using an ultra-fast catalyst, which would have the negative effect of giving me less time to work with it before it starts to set up. This way I get the full 20 minutes for mixing in all the various ingredients and carefully painting it in or filling the mold, then I can demold in 30 minutes. I tried the oven cure thing, and it works like a charm.

Next I intend to try another casting, but using the skinning method I described. I also want to try sanding the seam lines with wet/dry sandpaper and icewater as ToxicPapa recommends (Tom McLaughlin recommends sandpaper and alcohol I think). I'll also try ouit painting techniques and some patching for those inevitable mishaps where you trim the seam lines a little too closely.

Thursday, June 01, 2006

Christmas in June

I love when I'm starting a new project and order materials and all the packages start coming in.... especially when I get to work with new stuff. Today my Chavant NSP came in, a small box packed full of dense, pungent modeling clay. It smells a lot like regular (sulpher-based) plasticene, but NSP stands for non-sulpherated plasticene, and it's specially formulated to work with Platinum-cure silicones, which are extremely touchy and won't cure if there's even a hint of sulpher in the mold. Or just about anything else, including traces of natural latex or tin-based silicone.

Within the last few days (well, before the Memorial Day weekend, of course) I also got in a few coils of Almaloy armature wire and some thumb screws from Smallparts.com. I foolishly thought the nuts would come with them, since they're shown together in the picture (and because the screws are like a dollar apiece!!!), but no, I discovered you have to order them separately. This is a little trick I learned from Toxic Papa Ralph Cordero, fabrication guru extraordinnaire. Here's what's so great about thumb nuts:


They're ready-made for tie-downs! Scha-weet!

Next I expect to get my Dragon Skin, which is a super-soft platinum-cure silicone designed for use in the special effects makeup and animatronics industry. I really wanted to get a tin-cure silicone, which are just all-around friendlier to use, but it's hard to find one of the super-soft (shore-A 10 or less) effects silicones in a tin-cure that's translucent. Toxic Papa reccommends the Silicone Inc's GI-1110, which I was able to locate at The Compleat Sculptor, but only in light blue! It needs to be translucent so you can tint it with the (expensive) silicone pigments. He says if you ask they'll give you a translucent activator (the part that controls the color... the base is translucent already), but I sent them an email asking if they have it available, and haven't heard back from them yet. Maybe I'd be better off to call.

He also recommended another tin-cure silicone by Silicones Inc called GI-245, which I was unable to find on any website, including Silicones Inc's own site! But he assures me it's still being made. So I dug out a paper Compleat Sculptor catalog, and lo and behold, they have it! Why don't they list it on the website!!??? Actually tonight I went into deep-search mode, and I did discover it on the site, but it's very hard to locate. You have to go into Shopping Cart rather than the Online Catalog and there's a black bar across the top of the page that has a Search button and a listing of thier products broken down into sections. Under Casting and Molding Materials, somewhere on an unbelieveably long page, you'll find it. But there's another problem.... it comes with a choice of three different catalysts and I have no idea which one to use. They don't describe the differences between the catalysts. There's a chart that I think is supposed to do that, but I can't understand it. If I ever figure this puzzle out, I think I'll order some and give it a go. But first I'll play with my Dragon Skin when it comes in.

By itself, Dragon Skin is already quite soft, but for puppet use it needs to be softened still more by adding a plasticizer. The original industry standard for softening is called Silicone Oil or Silicone Fluid, which is what Toxic Papa reccommends, but there's a newer sexier product called Slacker that's supposed to solve a problem associated with the silicone oil. Apparently the it causes the silicone to leech oil... kind of nasty! Who wants to animate a puppet that's sweating oils? And what does that do to the paint, and the clothes? So I ordered both the silicone fluid and the slacker and I plan to test them out. I'm sculpting an arm and I'll try out the entire process, making a mold from Ultracal-30 and casting in Dragon Skin with both products added (separately of course) with a test armature in it to see how it bends etc. I need to make sure if 3 wires will be enough for a Dragon Skin arm, or I might have to use 4.

On the thread I linked to in my last blog entry, I got lots of great advice on using silicone, especially from Patrick Zung, who made puppets for Celebrity Deathmatch and loads of other projects. Unfortunately, the techniques he describes are very complicated and difficult. I hope to keep this pretty simple if possible. Toxic Papa says you can get away with using just a stone mold and filling both halves with silicone, then slap them together and rubber-band it shut till it sets up. Patrick doesn't beleive that will work, and has devised a complex technique using an injection gun and cutting vent holes and making a thin silicone glove mold that fits inside a shell mold of stone. Let me put it this way... if it's going to be that difficult, I could just use foam latex!

Sorry for all the wordiness and almost no pics, but I still haven't gotten around to setting up an account at one of the free image hosts. Next time I'll do that, and I should have some pics of my test arm and maybe some of my nifty new products!