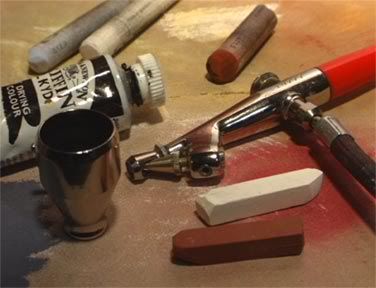
The first Dragonskin painting experiment is a success... sort of. It was quite an experience, and involved dredging up materials and equipment bought in some cases decades ago. I mostly wanted to try something ToxicPapa suggested, which is doing the coloring with pastels and then sealing it with a coat of clear Dragonskin thinned down with a solvent and applied with an airbrush. Gathering my materials I had to dig through cabinets and boxes I haven't looked into in many years... for instance the respirator I bought when I first started making airbrushed T-shirts but never ended up using. Glad I kept it sealed away in the original packaging, with instructions still intact! I also dug out a couple boxes of pastels I had bought and used only a few times. And the Paashe 'H' airbrush I picked up used from some guy at work long ago... this was the first time it's seen use since then. First time I've fired up my compressor in a few years too. And the worst part was the fan.... I wanted to set up a good positive draft through my work area to carry the solvent fumes outside (I haven't set up a Sven-Approved ventilation system yet!). So I trudged up two flights of stairs (several times actually... it was a decent workout) and carried my fan down from my bedroom and had to crawl under the deck, through heavily spider-infested territory in the semi-darkness. The things I do for my art, I tell ya! And these basement windows, they're ancient... iron frames set right into the concrete, no screens.... you just open them wide and let the insects start coming in. I swear, if I do this again It'll either be outside or I'll set up something a lot better.
Anyway, back to the real focus of this entry, the painting experiments. I started by grinding up some pastels on a piece of sandpaper and I picked some up on the corner of a paper towel and tapped it onto the silicone arms. They're slightly sticky anyway as really soft silicone will be, but I had powdered them to reduce that. They took the pastels fairly well, but it was pretty hard to work with. Not at all like a decent pastel paper. But with a little effort I was able to get some very nice gradations and blends. For these arms I don't need much color, just maybe a little red at the elbows and maybe the wrists, and on the fingers when I make the real arms. But I tried to blend colors to approximate the painting Scott Radke did on the heads. Here's the pic again from my old blog at www.darkstrider.net:

Lots of nice color blending there! Pastels are perfect for those kind of blends, which is why I wanted to try out this technique in particular. I tried a couple of others as well, but they weren't successful for reasons I'll go into in a bit. But back to last night's test. Here's what they came out looking like:
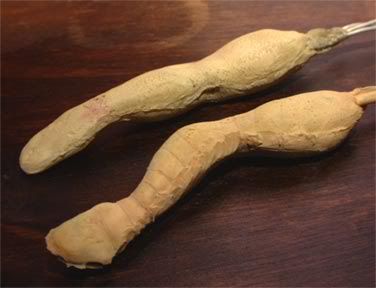
This is actually after sealing with thinned-down Dragonskin and baking for half an hour to speed-cure, but it looks pretty much identical to the way they did before I airbrushed on the rubber. Ok, once I was happy with the results of the pastel application the real fun began. With a growing horde of buzzing things swarming around the light I strapped on my respirator and goggles, feeling like Darth Vader, and cranked up the compressor. I mixed up a small batch of Dragonskin with approximately the same amount of plasticizer (silicone oil) that I used on the arms - about 50%, and then I added a nice big slug of D-Limonene. In his book Silicone Art, Tom McLaughlin recommends using 1 part silicone to 5 parts thinner, so I eyeballed it and mixed it up with my trusty paintbrush handle. Then I poured out a little into my airbrush cup and started spraying it on. If I wasn't wearing the goggles I would have smacked myself on the forehead right then, because I had never used the Paasche H before, and I wasn't sure how to adjust the spray pattern. I should have messed with it first with just some water. But no time for such niceties, so I just learned on the fly. Pretty simple actually. The first thing I noticed is that I couldn't detect the faintest hint of the bitter, eye-burning, throat-burning stench of the solvent. Inside my respirator cocoon I was experiencing a nice spring afternoon in the meadow while around me the buggies were in the gas chamber! Oh, and I had let my dog out a while ago, but the process took quite a while to get underway, so by now she was scratching like mad at the door, adding another layer of anxiety.
It went quite well, but then it was simply a matter of spraying a coating of clear rubber over my pastel work to seal it. Then I bent the wires into hooks and hung the arms in my convection oven to cure. All told, it was a great success up to this point. But something weird happened that I don't know what to make of. First here's a close-up shot of the "good arm" (paintwise anyway) so you can see the subtle color blending and the nice surface quality. Bear in mind I hadn't trimmed the seam lines before starting. I wish I would have.... it was a mental lapse, but this was just a test of the painting process, so try to ignore the ugly seam lines and other problems.
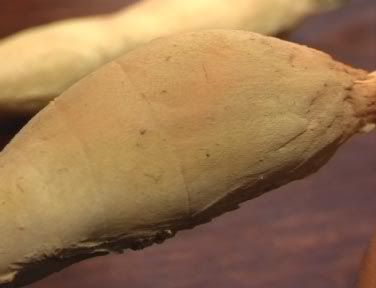
Ok, that was the pink arm - that one seems fine, but the other one - the translucent white one, did something weird:
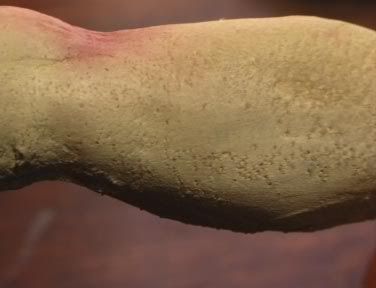
Those little holes weren't there to begin with... they appeared when I rubbed my thumb over it to test the paint. I wanted to make sure it wouldn't smear or peel off the way PAX paint can on foam latex. And it didn't at all... the paint seems to have bonded completely and become an integral part of the rubber. But when I rubbed my thumb over it fairly hard those little bubbles appeared. I could feel it happening too. Weird. I tried it on the other arm and it doesn't happen to that one. Weird. If anybody has any idea what could cause that, by all means please comment! I need to ask a few silicone gurus about it.
Here's something I just noticed after taking these pics that might explain it:
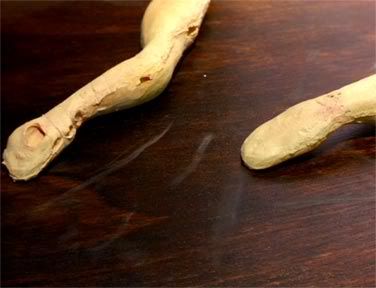
See the smudges on the table? They came from the silicone arms! Funny, they feel completely dry. But somehow the pigment is coming off. I thought maybe I just missed sme spots with my rubber selaing coat, but it smears off like that all over, and it seems kind of liquid/gooey (though you can't feel it at all on your fingers). So it seems like the Dragonskin just isn't fully cured. Possibly the added solvent slows the cure time. And I've thought of a possibility for the little holes in the one arm - maybe there was just too much pastel powder piled up. I know you're not supposed to put it on thick at all... if you want to build up a few layers you're supposed to seal between each layer. I don't know though... could be any number of things.
I tried a couple other techniques too while I was all set up. One was to mix powdered pastels directly into the thinned Dragonskin, and one was to add some oil paint to it. Neither worked for me. I'm sure I didn't do it right though... Tom McLaughlin recommends grinding pastels into the rubber with a pestle and mortar and using a very specific ratio, but I just sprinkled some in and mixed it with my paintbrush handle. I got a spotty, grainy mess when I tried to spray it. I got much the same when I tried oil paint (actually alkyd, which is oil paint in a synthetic Alkyd binder so it dries faster). With better measuring and grinding I'm sure it would work better. But these were just afterthoughts tacked on to my main experiment, and the buggies were getting thick and heavy by now, and the dog had nearly scratched through the door, so I wrapped it up. It was pretty scary taking off the respirator, I knew the basement was a gas chamber, especially after cleaning out the airbrush which involves spraying pure solvent through it followed by denatured alcohol. I wiped off every surface I had touched with the stinky stuff and put the paper towels in plastic bags that I tied shut. But sure enough, when I peeled off the respirator, it stank to high heaven! I was afraid the smell would linger for a long time... days or weeks even, but tonight it's almost entirely gone. I would have blogged this last night, but needless to say I had to vacate the basment for the rest of the night.

6 comments:
This is just a wild guess, but I wonder if too much handling since you first cast them has left oil from your hands on the silicon? Seems like some kind of contaminate caused all the bubbles like a typical fisheye you see during spray painting.
Did you do anything to clean the silicon before painting? Oh wait you mentioned powdering them – any residue left from that could cause the pinholes or bubbles.
Just a guess on my part.
Hmmm... yes, all good possibilities. I didn't clean the arms, I've handled them extensively and powdered them all the same. Strange that only one reacted that way.
For powdering, I didn't have the right stuff on hand, so I used microspheres made as an ultralight additive for casting resin. Worked nicely actually. Wonder if that could be the culprit? Since then I've got some clear makeup powder... can't remember if maybe I used that on some of the arms.
Seems like powder residue wouldn't do anything the pastels don't do though, unless it's because of the hollow microspheres.
My next experiment is for intrinsic coloring. If that works then I can avoid the problems associated with spraying solvents around in the basement. And hopefully avoid mysterious bubbles all over my puppets too!
Thanks again for a great post, I'll be referencing these when the time comes...I really like the pastel technique, but then, I really like pastels/charcoal...has given me a puppet idea (like I need more ideas), whenever I do my wooden-burned-tribal guy, I'm gonna try a plaster/charcoal puppet too....plaster parts w/ charcoal details....another great way to incorporate my 2-D techniques...pastel on plaster is fun....
Is it possible that the bubbles were under the surface all along, and the re-curing brought them up?
My eyes raced back and forth over this, a new exciting entry, yay. Another suspenseful, realist thriller read, Darkstrider.
Would the bubble texture show up/read on your digital video camera? And does this technique, when working, mean that the color stays flexible. Is that the big idea? Flexible and flat?
Do the compromising health effects of the chems really fully recede with the smell of them? We all need you to have a long life.
Hey Shellsters!
Consider this... I took these pics with the samew camera I'd be animating with, under the same lighting, same software etc. When I get in cliose with it things show up that you can't see with the naked eye.
Any paionting technique would result in flexible coloring assuming it works right. I just like the pastel technique because of its simpl;icity and direct color blending qualities. Seems easier than mixing pigments into the rubber and spraying it on.
One thing I like about using a *stinky* solvent like D-Limonene is that you're ultra-aware of its presence, which you wouldn't be with a low-odor solvent.
But as I said in a comment above, my next 'speriment is with intrinsic coloring, which means no solvents and no spraying. Hopefully that will work.
Hello! I'm from American Fine Arts Supplies and we can help you in casting, we have
monster makers , monster clay and etc., you can visit and inquire with us, here are the details....
American Fine Arts Supplies
2520 N. Ontario Street Burbank, California 91504
(818) 848-7593
support@afasupplies.com or gine@smartworksintl.com
website: https://afasupplies.com/
Thank you!
Post a Comment