

Recently Marc Spess emailed me about making a banner for my blog to post on his new Stopmotion Magic site. I don't really consider myself much when it comes to graphics, but I have learned a few things in Photoshop over the years, and I happened to find a couple of great images that really work well together. I'm pretty proud of this one. Be sure to check out the site, it looks like a great start! He's basically creating a vast stopmotion empire all on one host server, and members can create their own blogs and sites. Pretty cool.

My tie-down supplies were getting pretty depleted, plus I wanted to see about using some smaller thumb nuts for feet, so I placed an order from McMaster-Carr - a veritable Mecca of seemingly unlimited supplies for us stopmoes! Unfortunately, most of my discoveries were rather disappointing this time around. The picture above is a size comparison between a 6-32 thumb nut (on the right) from Smallparts.com and one of a 4-40 nut from McMaster. I was hoping it would actually be a little smaller, making for smaller feet, but it looks like they use the same size blanks as the 6-32 nuts, just drill a smaller hole in it. *Sigh* - oh well, at least it still makes for smaller holes I need to drill in the set!

Here you see my attempt to grind them down a bit smaller. I also picked up some 4-40 threaded rod , because I have yet to find 4-40 screws that are long enough to use for tie-downs. It might be a bit hard to make out, but I threaded a bunch of thumb nuts onto one of the rods, tightened them against each other so they don't move, and went to work with the Dremel to flatten two opposing sides. I also widened the channel a bit, because it's a little too small to fit two wires into, as I posted recently.
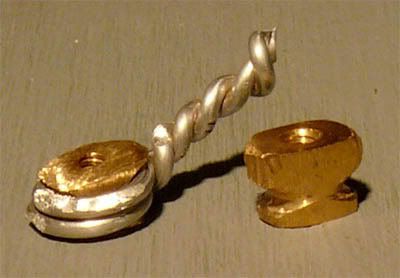

This is the result. Frustratingly, the wires end up larger in diameter than the nut itself, meaning all the grinding I did was essentially useless! I suppose I can grind down the inside part of the channel though, THAT should actually make a difference. Plus I found I could remove a bunch of excess brass at the top of the foot, which does streamline the profile a bit. At least THAT'S something!

And here's another disappointment - I was excited about McMaster-Carr's selection of annealed aluminum wire (all their aluminum wire is annealed, making it good armature wire, though it seems to be a bit stiffer than armature wire sold in art shops for sculpture). Even in this small pic, you can clearly see the endless stream of nicks all along the entire length of the wire! I had received a roll like this from them before, but was hoping it was just a fluke - some kind of factory reject that somehow made it through quality control... but both rolls I ordered this time are nicked like this! So no more ordering wire from them for me! Dammit, I have no other supplier for the sizes smaller than 1/16"... and I like to use something around 1/32" for hands/fingers. I suppose I just need to keep using the nicked wire until I can find another source.
Very disappointing in some respects, but I still consider McMaster-Carr a great source for lots of other supplies.... I also picked up some epoxy putty and a tube of Pliobond 20 flexible contact cement that I think will be a good substitute for Barge.... though it's made from a similarly toxic solvent. Oh well, at least I got this one in a tube rather than the giant can with brush-in-lid like I have of Barge (well past its shelf life - it's getting really stiff and rubbery.... very hard to use these days!)
9 comments:
I see 1/18" diameter (smaller than 1/16" but not 1/32" though) aluminum annealed wire on smallparts.com. Hopefully it doesn't have the quality issues you describe.
http://www.smallparts.com/products/descriptions/a12.cfm
mike
What length screw are you looking for tiedowns? I use 4-40 size, and found these http://www.nutty.com/fms.shtml
They have the 4-40 size from 1/4" up to 1 1/2" which is what I use.
I epoxied a wingnut on the end of each so they were easy to turn into place - I was usually able to fit a second wingnut on as well to tighten down the foot.
I love what Mr.Spess has done with Stop Motion Magic. The new banner looks fantastic! It will definitely draw attention. Marc sort of roped me into something also, he's adding that mold making tutorial I made to his collection of How To DVDs. I sent him a better copy of it and did some rework on the art that goes on the disk to personalize mine.
I really must figure out how to post banners as links on my blog, I wouldn't mind my page sporting your new fancy-shmancy banner button. Classy!
Wow, thanks for the responses!
Mike, I suspect there are some typos on that page at Smallparts. The way the chart is set up it looks like 1/18" is supposed to be 1/8" and 1/14" should be 1/4". Woukld be pretty weird if they'd just mix the sizes up randomly like that - plus I've never heard of any wire diameters like that. But I decided to search for Annealed Aluminum Wire and found Soft Annealed Aluminum Wire in 20 Guage (.032" or in other words 1/32") at http://www.whimsie.com/aluminum%20craft%20wire.html?gclid=CJSi4bjR65MCFQNaFQodb2PrVg
- Should be just the ticket!
Emmy, thanks! That would work, though personally I dislike using wing nuts. Too hard to fumble with blind under the table. If you'd ever try thumb screws/thumb nuts I bet you'd never go back! I think even regular hex nuts would beat out wing nuts. Just my opinion though.
Hey, thanks Ron! That banner is pretty freakin' HUGE for a blog though! And I doubt you'd be able to see it very well if it was much smaller. It works on the right kind of site... Marc has it set up so when somebody logs out it shows a big banner link to a blog at random I think. So in a case like that you can use these massive banners. On my blog I just use text links.... not enough room for fancy banners etc.
If you're willing to go through the trouble of grinding down the sides of the thumb nuts to make them smaller, why not just custom-build feet by putting threaded holes in flat pieces of brass?
As for connecting the wire, you could solder on a small bit of K&S tubing, and then epoxy glue the wires into the hole...
Or you could have aluminum feet (easier to find thicker stock) and drill holes in the back, like Nick does.
cool banner indeed !
jriggity
Hey /sven, I definitely thought about that... but I don't trust pure epoxy connections. I like the solid physical connection of the wires securely wrapped around the nut and then held in place with JB Kwikweld... no chance for it to just break loose... the only way it's breaking is if the wire itself snaps.
I COULD machine something similar to a thumb nut, but that would probably be more work than just grinding out the side channels a bit and taking a little off the top. I've now discovered T-nuts, (that I think Jeffrey mentioned before). Haven't tried them, but they look promising. it's essentially just a thin sleeve that's threaded inside, with a small ledge running around the top of it.
Thanks Justin!!!
(^ depends on the type of epoxy.
(^ and thw wire.. and the weight and the amount of twists it takes to make the dern thing snap.
(^.. and its toxicity level.
Post a Comment