
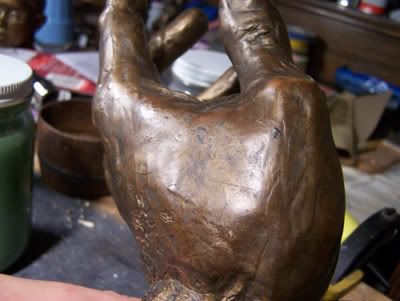
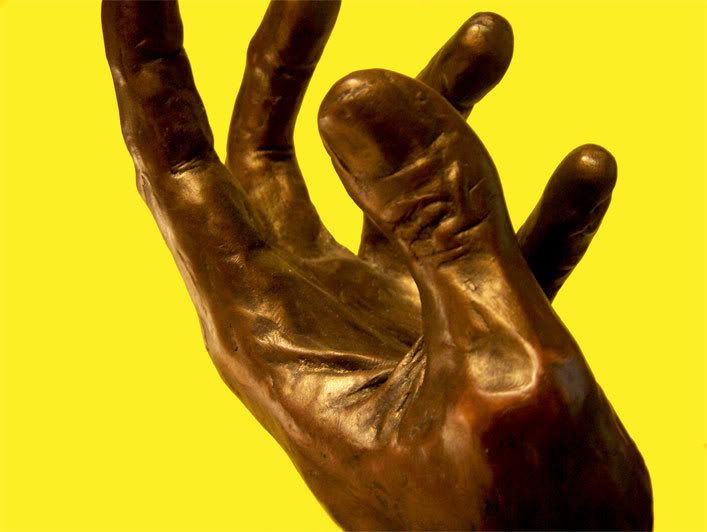
The glare is so bad it destroys the surface, which in real life looks great! As a result I was always unable to post (decent) pics of these bronzed sculpts when i wanted to show them off. Well I finally decided to try pointing the lights completely away from it, and putting a bright background behind it so the camera cuts exposure levels. Here's the result:

(Click tiny thumbnail to see larger version)
The camera told me there wasn't enough light for a good exposure, but I taunted it and snapped away anyway. Guess I showed it who's boss, huh?
11 comments:
What a stunning, well done sculpture, Mike. Brilliant. I liked the lighting in the first photo just as much.
More sculpture please?
excellent!
jriggity
You sculpted that?! You're blowin' my mind!
Little secret -
Probably the easiest thing in the world to sculpt is your own hand! Start by making a simple wire armature, laying it out right on your won hand, and then bulk it out with clay, constantly checking for correct proportioning etc. At this point it's just laid flat on the table, and you're bulking up the back of the hand (or the front, I started with the back). Then pry it off the table and start to bulk out the underside, the big muscle at the base of the thumb etc.
Now pose it, and you've got the best model in the world! Perfect communication, no complaining, willing to hold difficult poses as long as necessary etc.
I just wish I had used epoxy putty to 'freeze' the fingers in their pose before adding sculpey - I ran into problems with them bending as i was sculpting on them. That's why some of them (basically all of them) look pretty crude and unfinished. I had to hold a hand behind them as i worked, but that became problematic when I had both sides of the fingers nearly finished.
You know, I thought of a couple things I forgot to add to my original description for this entry - I'll put it here for those willing to dip deeper - the cursory and the lazy who only skim the surface won't get this info.
Originally, in the first shot, I had used my new Pro Light, which uses a halogen globe and has a strong blue-ish flavor to it. I decided to instead use only incandescent light, which is warmer and more orangey, complementing the colors of the bronze.
Also I photoshopped the resulting picture - the hand looked pretty dark until I adjusted the levels to bring the gamma up significantly. If I had tried this with the first pic all that glare would just have been a huge blasted-out area with no visual info, but there was so little glare in this pic that I was able to bring the gamma up pretty far and get only minimal glare, which falls only on edges and actually complements the metallic look rather than destroying the image.
Really nice sculpt Mike, great lighting tips too
mf
Another trick for shooting metallic objects, while eliminating 'hot spots' is using a polarizing filter on your lens. If you really want control get a 'circular polarizer' which has two opposed polarizing filters the outer which you can rotate 360%. You simply look thru the lens at the hot spot and rotate the outer filter until the hot spot disappears - volia! - they are an investment though at $50 - $100 !!
Photoshop too has a solution. It's one of the best PS tips I ever picked up online.
Go ahead, shoot for your highlights, letting the midtone/shadow range darken too much. Open'er up, use "Color Range..." under the Selection pull down.
This brings up a powerful window where you can use the eyedropper tool to select the too dark areas, it makes a selection of all pixels in that range with marcing ants after ok'ing. (preview shows the selection as white pixels and I rec a "Fuzziness" of about 64 should do)
Then you put a 25 pixel feather on that selection, hide the ants, hit command L (bring up the Levels window). Use the Level's slider that you were talking about to lighten the levels specifically in the selected too dark areas only, leaving your highlights perfectly intact!
It never fails to look natural and has taken many of my bad shots and made them wonderfully... useable.
I don't know much about all this digital mumbo jumbo ;P, but that's a wicked sculpt.
-Andrew Liebau-
Thanks everybody! Lots of great tips.
I thought about a polarizing filter - AFTER I had finished up this blog entry! I have one or two, but not for this camera.... a shame they all take different sizes! Of course I could probably rig it up if the filter is bigger than my lens.
Aha, Mike! You've picked up the trick clay animators use to keep their puppets from having glare (especially if they're made of Sculpey).
Sloth suggested the backlighting thing awhile back, it really works, but might force you to deepen your depth of field, which won't really be a problem because you've said that you like a large depth of field anyway.
As far as the polarizing filter, Misha mentioned that to me in an email last year. I didn't get it because I wanted a mist filter, but the polarizing filter might be better in the long run.
Post a Comment